


If you are a developer or architect, chances are you have either heard of or are using microservices within your applications stack. With the versatility and benefits the microservices offer, it’s no surprise that development teams have made microservices a mainstay of modern applications, particularly within the Java ecosystem. Instead of constructing monolithic applications with tightly coupled components, microservices promote breaking down an application into smaller, independent, focused services.
Adopting a microservices architecture supports modern applications in many ways, with two of the big highlights being enhanced scalability and improved application resilience. As two essential factors in performant applications and with the demands of modern users, using microservices and leveraging the benefits they bring can be an indispensable tool for architects and developers.
If you’re a Java architect or developer seeking to grasp the essence of microservices, their advantages, challenges, and how to build them effectively, you’ve come to the right place. In this blog, we will cover all of the basics and then jump straight into examples of how to build microservices with various Java frameworks. Let’s begin by looking at what a microservice is in more detail.
What are microservices?
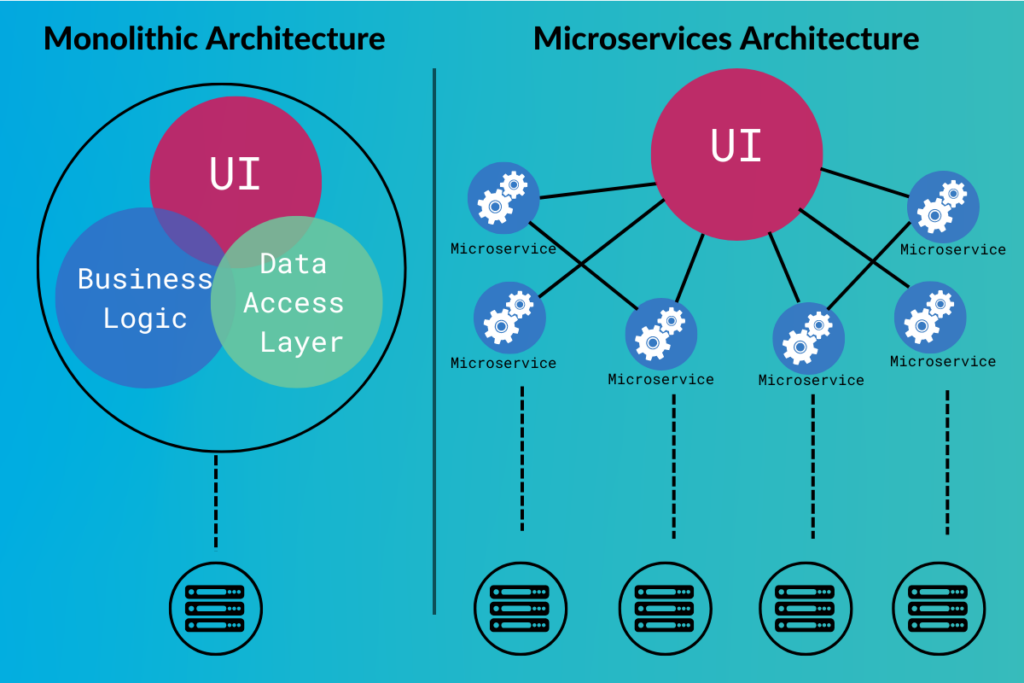
Microservices are an architectural approach that brings a different outcome than traditional monolithic applications. Like other approaches to implementing a service-oriented architecture, Instead of building a single, large unit, microservices advocate for decomposing applications into smaller, independently deployable services. Microservices communicate with one another using lightweight protocols such as REST (REpresentational State Transfer) or gRPC (general Remote Procedure Calls). This means that each microservice focuses on a specific business domain or capability, simplifying development, testing, and understanding of what each component does. Their loose coupling allows for independent updates and modifications, enhancing system flexibility and many other benefits.
What are microservices in Java?
Microservices in Java leverage the Java programming language, its rich ecosystem, and specialized web service frameworks to construct applications that follow a microservices architecture. As mentioned in the previous section, this approach decomposes applications into smaller, focused, and independently deployable services. Each service tackles a specific business function, communicating with others. Generally, services use lightweight mechanisms such as exposing functionality through RESTful APIs or messaging systems, such as gRPC, etc. Popular Java frameworks like Spring Boot, Dropwizard, Quarkus, and others further simplify the process of creating microservices by providing features and functionality that lend themselves well to building microservices and distributed systems.
Advantages of microservices
Why should development teams opt to use microservices? There are many reasons microservices should be used. Let’s look at a high-level breakdown of some of the critical benefits microservices bring:
Scalability: Microservices allow you to scale individual services independently, optimizing resource usage and cost-efficiency.
Resilience: Microservices improve fault tolerance; failures in one service are less likely to bring down the entire application.
Technology agnosticism: Choose the most suitable technologies and programming languages for each service, promoting flexibility and preventing technology lock-in.
Simplified deployment: Roll out changes to individual services quickly and easily, enabling faster iterations without redeploying an entire application.
Improved maintainability: The well-defined boundaries of microservices make them easier to understand, modify, and test, simplifying development and support.
Depending on the project, microservices may offer these advantages plus many more when it comes to building and supporting an application. That being said, microservices aren’t necessarily the silver bullet for all the problems of modern development. Next, we will cover some of the challenges that microservice implementations bring with them.
Challenges in microservices
As with anything good, there always come some drawbacks. While microservices offer the advantages we talked about above, it’s essential to acknowledge the complexities they introduce as well:
Increased operational complexity: Managing a distributed system with multiple microservices inherently presents more significant operational overhead in deployment, monitoring, and service communication.
Distributed data management: Ensuring data consistency across multiple microservices becomes more complex, often requiring strategies like eventual consistency to replace traditional database transactions.
Communication overhead: Since services communicate via a network, this introduces potential latency and the need to handle partial failures gracefully. Choosing suitable protocols and patterns (like circuit breakers) must be factored into the system design.
Testing: Testing in a microservices environment involves individual services, interactions, and dependencies, demanding more complex integration and end-to-end testing.
Observability: Gaining visibility into a distributed system requires extensive logging, distributed tracing, and metrics collection. Monitoring each service and the overall system’s health can be relatively complex as the system’s architecture expands.
Despite these challenges, the benefits of microservices often outweigh the complexities. Careful planning, appropriate tools, service, discovery, and a focus on best practices can help manage these challenges effectively.
Examples of microservices frameworks for Java
If you’re looking to build microservices, the Java world offers a diverse collection of frameworks that excel in building them. Because of the technology agnosticism of microservices, different programming languages and frameworks can be used from service to service. If one framework excels in the functionalities you need for a particular microservice, you can use it as a one-off choice or build out your entire microservice stack in a single technology. Here’s a look at some of the top frameworks for building microservices with Java.:
Spring Boot
One of the most well-known enterprise frameworks for Java, Spring Boot sits atop the Spring Framework. Spring Boot helps to simplify microservice development with features like auto-configuration, embedded servers, and seamless integration with the vast Spring ecosystem that many organizations are already using.
Why it’s well-suited:
- Ease of use and rapid development
- Extensive community and resources
- Excellent for both traditional and reactive microservice approaches
Dropwizard
Provides a focused and opinionated way to build RESTful microservices, bundling mature libraries for core functionality.
Why it’s well-suited:
- Streamlined setup and quick project starts
- Emphasis on production-readiness (health checks, metrics)
- Ideal for RESTful services
Quarkus
A Kubernetes-native Java framework engineered for fast startup times, low memory footprints, and containerized environments.
Why it’s well-suited:
- Optimized for modern cloud deployments
- Prioritizes developer efficiency
- Outstanding performance characteristics
Helidon
From Oracle, Helidon is a lightweight toolkit offering both reactive and MicroProfile-based programming models.
Why it’s well-suited
- Flexibility in development styles
- Focus on scalability
Jersey
Jersey is the JAX-RS (Java API for RESTful Web Services) reference implementation, providing a core foundation for building RESTful microservices.
Why it’s well-suited:
- Standards-compliant REST framework
- Allows for granular control
Play Framework
Play is a high-productivity, reactive framework built on Akka and designed for web applications. It is well-suited for both RESTful and real-time services.
Why it’s well-suited:
- Supports reactive programming paradigms
- Strong community and backing
As you can see, many of these frameworks are focused on building RESTful services. This is because most microservices are exposed via API, most of which are REST-based. Now that we know a bit about the frameworks, let’s take a dive into exactly what the code and configuration looks like when building a service with them.
How to create Microservices using Dropwizard
In this example, we will create a basic “Hello World” microservice using Dropwizard. This service will respond to HTTP GET requests with a greeting message.
Step 1: Setup Project with Maven
First, you’ll need to set up your Maven project. Add the following to your project’s pom.xml file to include Dropwizard dependencies:
<dependencies>
    <dependency>
        <groupId>io.dropwizard</groupId>
        <artifactId>dropwizard-core</artifactId>
        <version>2.1.0</version>
    </dependency>
</dependencies>
Replace the “2.1.0” version with the latest version of Dropwizard or the version that you wish to use if there is a specific one.
Step 2: Configuration Class
Create a configuration class that will specify environment-specific parameters. This class should extend io.dropwizard.Configuration.
import io.dropwizard.Configuration;
public class HelloWorldConfiguration extends Configuration {
    // Add configuration settings here
}
Step 3: Application Class
Create an application class that starts the service. This class should extend io.dropwizard.Application.
import io.dropwizard.Application;
import io.dropwizard.setup.Bootstrap;
import io.dropwizard.setup.Environment;
public class HelloWorldApplication extends Application<HelloWorldConfiguration> {
    public static void main(String[] args) throws Exception {
        new HelloWorldApplication().run(args);
    }
    @Override
    public void initialize(Bootstrap<HelloWorldConfiguration> bootstrap) {
        // Initialization code here
    }
    @Override
    public void run(HelloWorldConfiguration configuration, Environment environment) {
        final HelloWorldResource resource = new HelloWorldResource();
        environment.jersey().register(resource);
    }
}
Step 4: Resource Class
Next, create a resource class that will handle web requests. This class will define the endpoint and the method to process requests.
import javax.ws.rs.GET;
import javax.ws.rs.Path;
import javax.ws.rs.Produces;
import javax.ws.rs.core.MediaType;
@Path(“/hello-world”)
public class HelloWorldResource {
    @GET
    @Produces(MediaType.TEXT_PLAIN)
    public String sayHello() {
        return “Hello, World!”;
    }
}
Step 5: Build and Run
To build and run your application:
1. Compile your project with Maven: mvn clean install
2. Run your application: java -jar target/your-artifact-name.jar server
After running these commands, your Dropwizard application will start on the default port (8080). You can access your “Hello World” microservice endpoint by navigating to “http://localhost:8080/hello-world” in your web browser or using a tool like cURL:
curl http://localhost:8080/hello-world
This should return the greeting: “Hello, World!”
This is a simple introduction to creating a microservice with Dropwizard. From here, you can expand your service with more complex configurations, additional resources, and dependencies as needed.
How to create microservices using Spring Boot
In this second example, we will develop a “Hello World” microservice using Spring Boot. This service will respond to HTTP GET requests with a personalized greeting message, similar to our previous example.
Step 1: Setup Project with Spring Initializr
Start by setting up your project with Spring Initializr:
– Visit https://start.spring.io/
– Choose Maven Project with Java and the latest Spring Boot version
– Add dependencies for Spring Web
– Generate the project and unzip the downloaded file
Step 2: Application Class
With the base project unzipped, we will create the main application class that boots up Spring Boot. This is automatically generated by Spring Initializr, but here’s what it typically looks like:
package com.example.demo;
import org.springframework.boot.SpringApplication;
import org.springframework.boot.autoconfigure.SpringBootApplication;
@SpringBootApplication
public class HelloWorldApplication {
    public static void main(String[] args) {
        SpringApplication.run(HelloWorldApplication.class, args);
    }
}
Step 3: Controller Class
Create a controller class that will handle the HTTP requests. Use the @RestController annotation, which includes the @Controller and @ResponseBody annotations that result in web requests returning data directly.
package com.example.demo;
import org.springframework.web.bind.annotation.GetMapping;
import org.springframework.web.bind.annotation.RequestParam;
import org.springframework.web.bind.annotation.RestController;
@RestController
public class HelloWorldController {
    @GetMapping(“/hello”)
    public String sayHello(@RequestParam(value = “name”, defaultValue = “World”) String name) {
        return String.format(“Hello, %s!”, name);
    }
}
This controller has a method, sayHello, that responds to GET requests at “/hello”. It uses @RequestParam to optionally accept a name value, and if none is provided, “World” is used as a default.
Step 4: Build and Run
To build and run your application:
1. Navigate to the root directory of your project via the command line.
2. Build your project with Maven:
mvn clean package
3. Run your application:
java -jar target/demo-0.0.1-SNAPSHOT.jar
You’ll need to replace demo-0.0.1-SNAPSHOT.jar file name with your actual jar file name.
Once again, to access your “Hello World” microservice, navigate to “http://localhost:8080/hello” in your web browser or use a tool like cURL:
curl http://localhost:8080/hello?name=User
If everything works as it should, this should return: “Hello, User!” in the response.
This example demonstrates a basic Spring Boot application setup and exposes a simple REST endpoint. As you expand your service, Spring Boot makes it easy to add more complex functionalities and integrations.
How to create Microservices using Jersey
Next, we’ll build a “Hello World” microservice using Jersey that responds to HTTP GET requests with a greeting message just as the other examples so far have.
Step 1: Setup Project with Maven
First, you’ll need to create a new Maven project and add the following dependencies to your pom.xml to include Jersey and an embedded server, Grizzly2:
<dependencies>
    <dependency>
        <groupId>org.glassfish.jersey.containers</groupId>
        <artifactId>jersey-container-grizzly2-http</artifactId>
        <version>2.35</version>
    </dependency>
    <dependency>
        <groupId>org.glassfish.jersey.inject</groupId>
        <artifactId>jersey-hk2</artifactId>
        <version>2.35</version>
    </dependency>
    <dependency>
        <groupId>org.glassfish.jersey.core</groupId>
        <artifactId>jersey-server</artifactId>
        <version>2.35</version>
    </dependency>
    <dependency>
        <groupId>org.glassfish.jersey.core</groupId>
        <artifactId>jersey-client</artifactId>
        <version>2.35</version>
    </dependency>
    <dependency>
        <groupId>org.glassfish.jersey.media</groupId>
        <artifactId>jersey-media-json-jackson</artifactId>
        <version>2.35</version>
    </dependency>
</dependencies>
You can replace “2.35” with the latest version of Jersey if needed or another version if you have a specific one you need to use.
Step 2: Application Configuration Class
Create a configuration class that extends ResourceConfig to register your JAX-RS components:
package com.example.demo;
import org.glassfish.jersey.server.ResourceConfig;
public class JerseyConfig extends ResourceConfig {
    public JerseyConfig() {
        register(HelloWorldResource.class);
    }
}
Step 3: Resource Class
We will also need to create a resource class that will handle web requests:
package com.example.demo;
import javax.ws.rs.GET;
import javax.ws.rs.Path;
import javax.ws.rs.Produces;
import javax.ws.rs.core.MediaType;
@Path(“/hello”)
public class HelloWorldResource {
    @GET
    @Produces(MediaType.TEXT_PLAIN)
    public String sayHello() {
        return “Hello, World!”;
    }
}
Step 4: Main Class to Start Server
Our last bit of code is where we will create the main class to start up the Grizzly2 HTTP server:
package com.example.demo;
import org.glassfish.grizzly.http.server.HttpServer;
import org.glassfish.grizzly.http.server.NetworkListener;
import org.glassfish.jersey.grizzly2.httpserver.GrizzlyHttpServerFactory;
import javax.ws.rs.core.UriBuilder;
import java.net.URI;
public class Main {
    public static void main(String[] args) {
        URI baseUri = UriBuilder.fromUri(“http://localhost/”).port(8080).build();
        JerseyConfig config = new JerseyConfig();
        HttpServer server = GrizzlyHttpServerFactory.createHttpServer(baseUri, config, false);
        NetworkListener listener = new NetworkListener(“grizzly”, “localhost”, 8080);
        server.addListener(listener);
        try {
            server.start();
            System.out.println(“Server started at: http://localhost:8080/hello”);
            System.in.read();
            server.shutdownNow();
        } catch (Exception e) {
            System.err.println(“Error starting Grizzly server: ” + e.getMessage());
            server.shutdownNow();
        }
    }
}
Step 5: Build and Run
To build and run your application:
1. Navigate to the root directory of your project via the command line.
2. Compile your project with Maven:
mvn clean package
3. Run your application:
java -jar target/your-artifact-name.jar
Replace your-artifact-name.jar with your actual jar file name that your build has output.
Just as we have with the previous examples, to access your “Hello World” microservice, navigate to “http://localhost:8080/hello” in your web browser or use cURL:
curl http://localhost:8080/hello
This API call should return “Hello, World!” in the API response.
This example demonstrates how to set up a basic Jersey application that can be used as a REST-based microservice.
How to create Microservices using Play Framework
Lastly, we will look at how to build a similar microservice using Play Framework. This example will mirror the previous ones and build a “Hello World” microservice that responds to HTTP GET requests with a greeting message.
Step 1: Setup Project with sbt
First, set up your project using sbt (Simple Build Tool), which is the standard build tool for Scala and Play applications. Here’s how you can set up a basic structure:
1. Install sbt: Follow the instructions on the official sbt website to install sbt.
2. Create a new project: You can start a new project using a Play Java template provided by Lightbend (the company behind Play Framework), which sets up everything you need for a Play application. Here is the command to do so:
sbt new playframework/play-java-seed.g8
This command creates a new directory with all the necessary files and folders structured.
Step 2: Controller Class
Modify or create a Java controller in the app/controllers directory. This class will handle the HTTP requests:
package controllers;
import play.mvc.*;
public class HomeController extends Controller {
    public Result index() {
        return ok(“Hello, World!”);
    }
}
In Play, Result types determine the HTTP response. The ok() method creates a 200 OK response with a string.
Step 3: Routes Configuration
Next, we will define the application’s routes in the conf/routes file. This file tells Play what controller method to run when a URL is requested:
# Routes
# This file defines all application routes (Higher priority routes first)
# ~~~~
# An example controller showing a sample home page
GET     /hello        controllers.HomeController.index()
This configuration means that HTTP GET requests to “/hello” will be handled by the index() method of HomeController.
Step 4: Build and Run
To run your Play application, you’ll need to do the following:
1. Open a terminal and navigate to your project’s root directory.
2. Execute the following command to start the application:
sbt run
Just like the previous examples, once the application is running, you can access it by visiting http://localhost:9000/hello in your web browser or using cURL:
curl http://localhost:9000/hello
This should also return the “Hello, World!” response we saw in the other examples.
This example gives a straightforward introduction to building a microservice with Play Framework.
Best Practices for Microservices
Before you begin designing and implementing microservices, let’s take a look at some best practices to start you off on the right foot. To maximize the benefits and successfully navigate the challenges of microservices, here are some essential best practices to keep in mind:
- Domain-driven design (DDD): Align microservice boundaries with business domains or subdomains to ensure each service has a clear and well-defined responsibility.
- Embrace loose coupling: Minimize dependencies between microservices, allowing them to evolve and be deployed independently.
- API versioning: Implement a thoughtful versioning strategy for your microservice APIs to manage changes without breaking clients.
- Decentralized data management: Choose appropriate data management strategies for distributed systems (eventual consistency, saga patterns, etc.).
- Architectural drift: Once the application’s baseline is established, ensure you can actively observe how architectural drift is changing from the target state or baseline to avoid costly technical debt.
- Observability: Implement end-to-end logging, monitoring, and distributed tracing to gain visibility across all services individually and across the entire system.
- Resilience: Design for failure using patterns like circuit breakers, retries, and timeouts to prevent cascading failures.
- Security: Secure your microservices at multiple levels. This includes adding security at the network level, API level, and within individual service implementations.
- Automation: Automate as much of the build, deployment, and testing processes as possible to streamline development.
- Containerization: Use containers to package microservices in containers (e.g., Docker) for portability and easy deployment via orchestration platforms (e.g., with Kubernetes).
With these best practices, your microservices should start off on the right path. It’s important to remember that best practices can evolve and your organization may also have recommendations you should take into consideration. When it comes to designing and implementing microservices, architecture plays a big role. Next we will take a look at how vFunction and architectural observability can help with Java microservice creation and support.
How vFunction can help with microservices design in Java
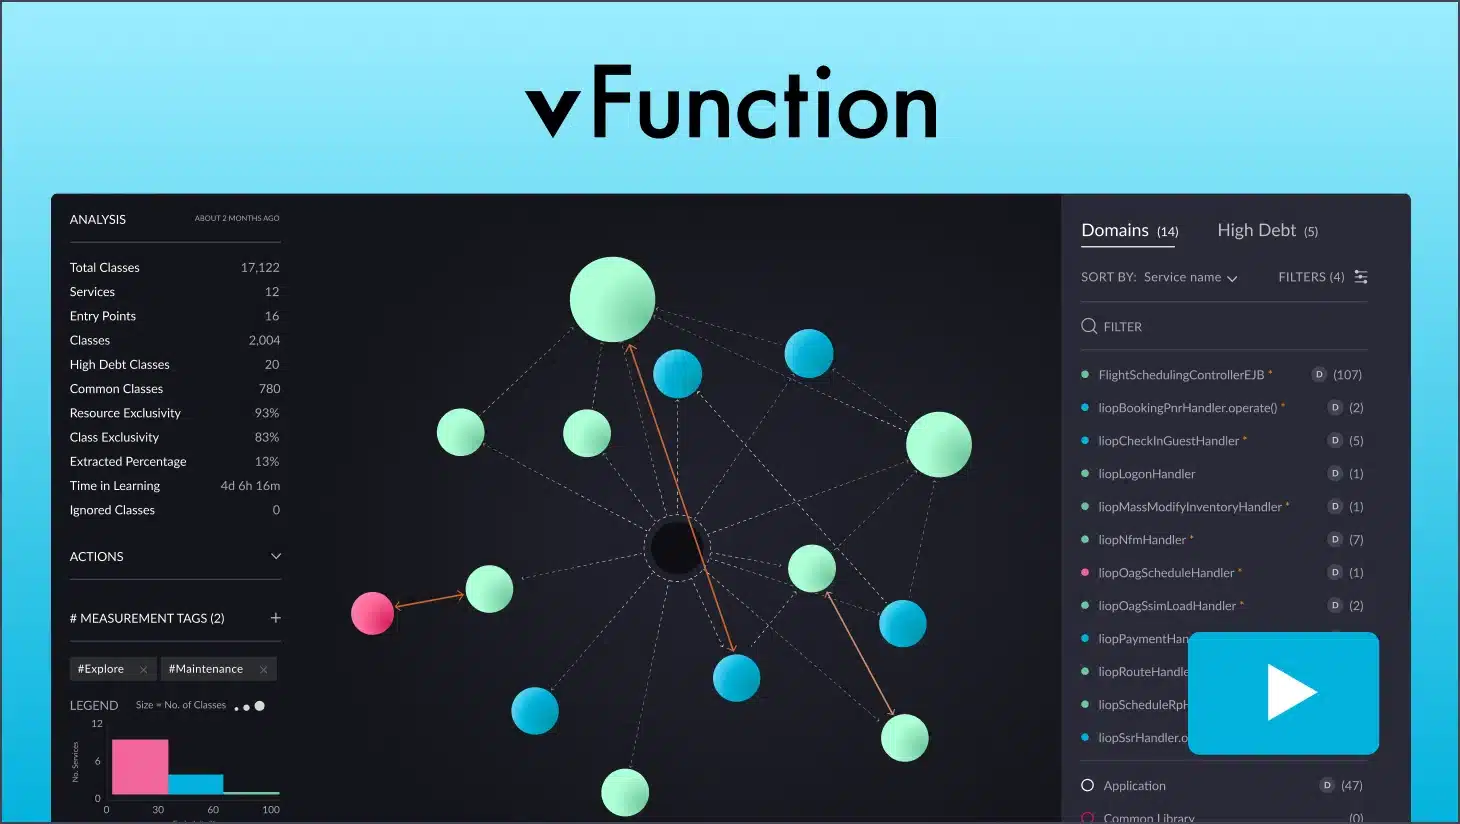
The choice to refactor existing services into microservices or to build them net new can be challenging. Refactoring code, rethinking architecture, and migrating to new technologies can be complex and time-consuming. This is where vFunction becomes a powerful tool to simplify and inform software developers and architects about their architecture as they begin to adopt microservices or rewrite existing monolithic architectures into microservices.

Let’s break down how vFunction aids in this process:
1. Automated analysis and architectural observability: vFunction begins by deeply analyzing your application’s codebase, including its structure, dependencies, and underlying business logic. This automated analysis provides essential insights and creates a comprehensive understanding of the application, which would otherwise require extensive manual effort to discover and document. Once the application’s baseline is established, vFunction kicks in with architectural observability, allowing architects to actively observe how the architecture is changing and drifting from the target state or baseline. With every new change in the code, such as the addition of a class or service, vFunction monitors and informs architects and allows them to observe the overall impacts of the changes.
2. Identifying microservice boundaries: One crucial step in the transition is determining how to break down an application into smaller, independent microservices. vFunction’s analysis aids in intelligently identifying domains, a.k.a. logical boundaries, based on functionality and dependencies within the overall application, suggesting optimal points of separation.
3. Extraction and modularization: vFunction helps extract identified components and package them into self-contained microservices. This process ensures that each microservice encapsulates its own data and business logic, allowing for an assisted move towards a modular architecture. Architects can use vFunction to modularize a domain and leverage the Code Copy feature to accelerate microservices creation by automating code extraction. The result is a more manageable application that is moving towards your target-state architecture.
Key advantages of using vFunction
- Engineering velocity: vFunction dramatically speeds up the process of creating microservices and moving monoliths to microservices, if required. This increased engineering velocity translates into faster time-to-market and a modernized application.
- Increased scalability: By helping architects view their existing architecture and observe it as the application grows, scalability becomes much easier to manage. By seeing the landscape of the application and helping to improve the modularity and efficiency of each component, scaling is more manageable.
- Improved application resiliency: vFunction’s comprehensive analysis and intelligent recommendations increase your application’s resiliency by supporting more modular architecture. By seeing how each component is built and interacts with each other, informed decisions can be made in favor of resilience and availability.
Conclusion
Microservices offer a powerful way to build scalable, resilient, and adaptable Java applications. They involve breaking down applications into smaller, independently deployable services, increasing flexibility, maintainability, and the ability to scale specific components.
While microservices bring additional complexities, Java frameworks like Spring Boot, Dropwizard, Quarkus, and others simplify their development. Understanding best practices in areas like domain-driven design, API design, security, and observability is crucial for success.Whether you’re building a system from scratch or refactoring an existing one, vFunction is the architect’s direct vision into the current state of your application and helps you to understand how changes affect the architecture as it evolves. Architectural observability is a must have tool when considering microservice development or promoting good architectural health for existing microservices. To learn more about how vFunction can help you modularize your microservice architecture, contact our team today.